Autohub is 100% translatable and the easiest way to translate it is using the third party plugin Loco Translate WordPress Plugin. In order for the translations to work you need to first change the general language of your website. You can do so by going to Dashboard -> Settings -> General and change the language of your website. After you have done so follow the steps below:
Step 1: Install & activate Loco Translate WordPress Plugin.
Step 2: Go to Loco Translate > Themes and click Autohub theme.
Step 3: Click on new language.
Step 4: Select your language that you want to translate the theme in.
Step 5: Choose the location where the translation file will be save. Recommended: Please use the default location languages/loco/themes/autohub-<locale>.po otherwise you might lose all your translations after updating the theme.
Step 6: Click on start translating.
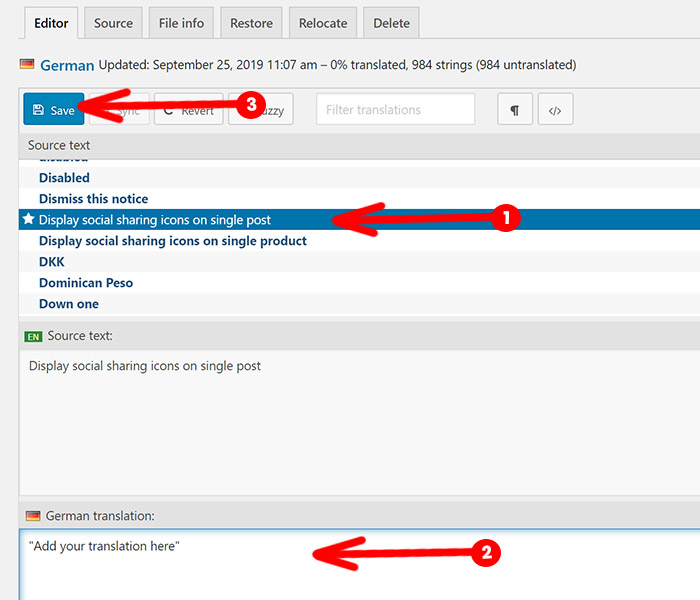
Step 7: Click on the text that you want to translate, add the translation below the source text and click on save.
Why can’t I find the text that I want to translate?
Not all strings are located in the Autohub theme, most of the core features of are located in the Autohub Core plugin which means so are the related strings. To translate the website 100% make sure to translate the theme and the core plugin in your language. You can translate the plugins by going to Loco Translate > Plugins and start following the same steps from step 3.
After Updating the theme & the core plugin
The theme & the core plugin are always under development, text gets added or modified all the time. After updating the theme and the plugin you might not be able to find the newly added/modified text, in this case click the sync button next to the save button and search again. This will synchronize the .pot files and fix your issue.